Slide guitar means you stop fretting notes with your fingertips and let a glass or metal tube glide along the strings instead. The slide touches the strings lightly, and the pitch comes from where the slide sits, not from where your fingers press. That's the whole trick, and this guide shows you how to play slide guitar without the squeaks and out-of-tune wobble that scare most beginners off.
You'll learn how to choose and wear a slide, the four technique habits that make it sound clean, which open tuning to start with, and your first real licks. If you're searching for slide guitar for beginners advice you can use tonight, this is it.
Quick CTA:
Choosing a Slide
Walk into any music shop and the slide wall looks overwhelming, but it comes down to three decisions: material, finger, and weight.
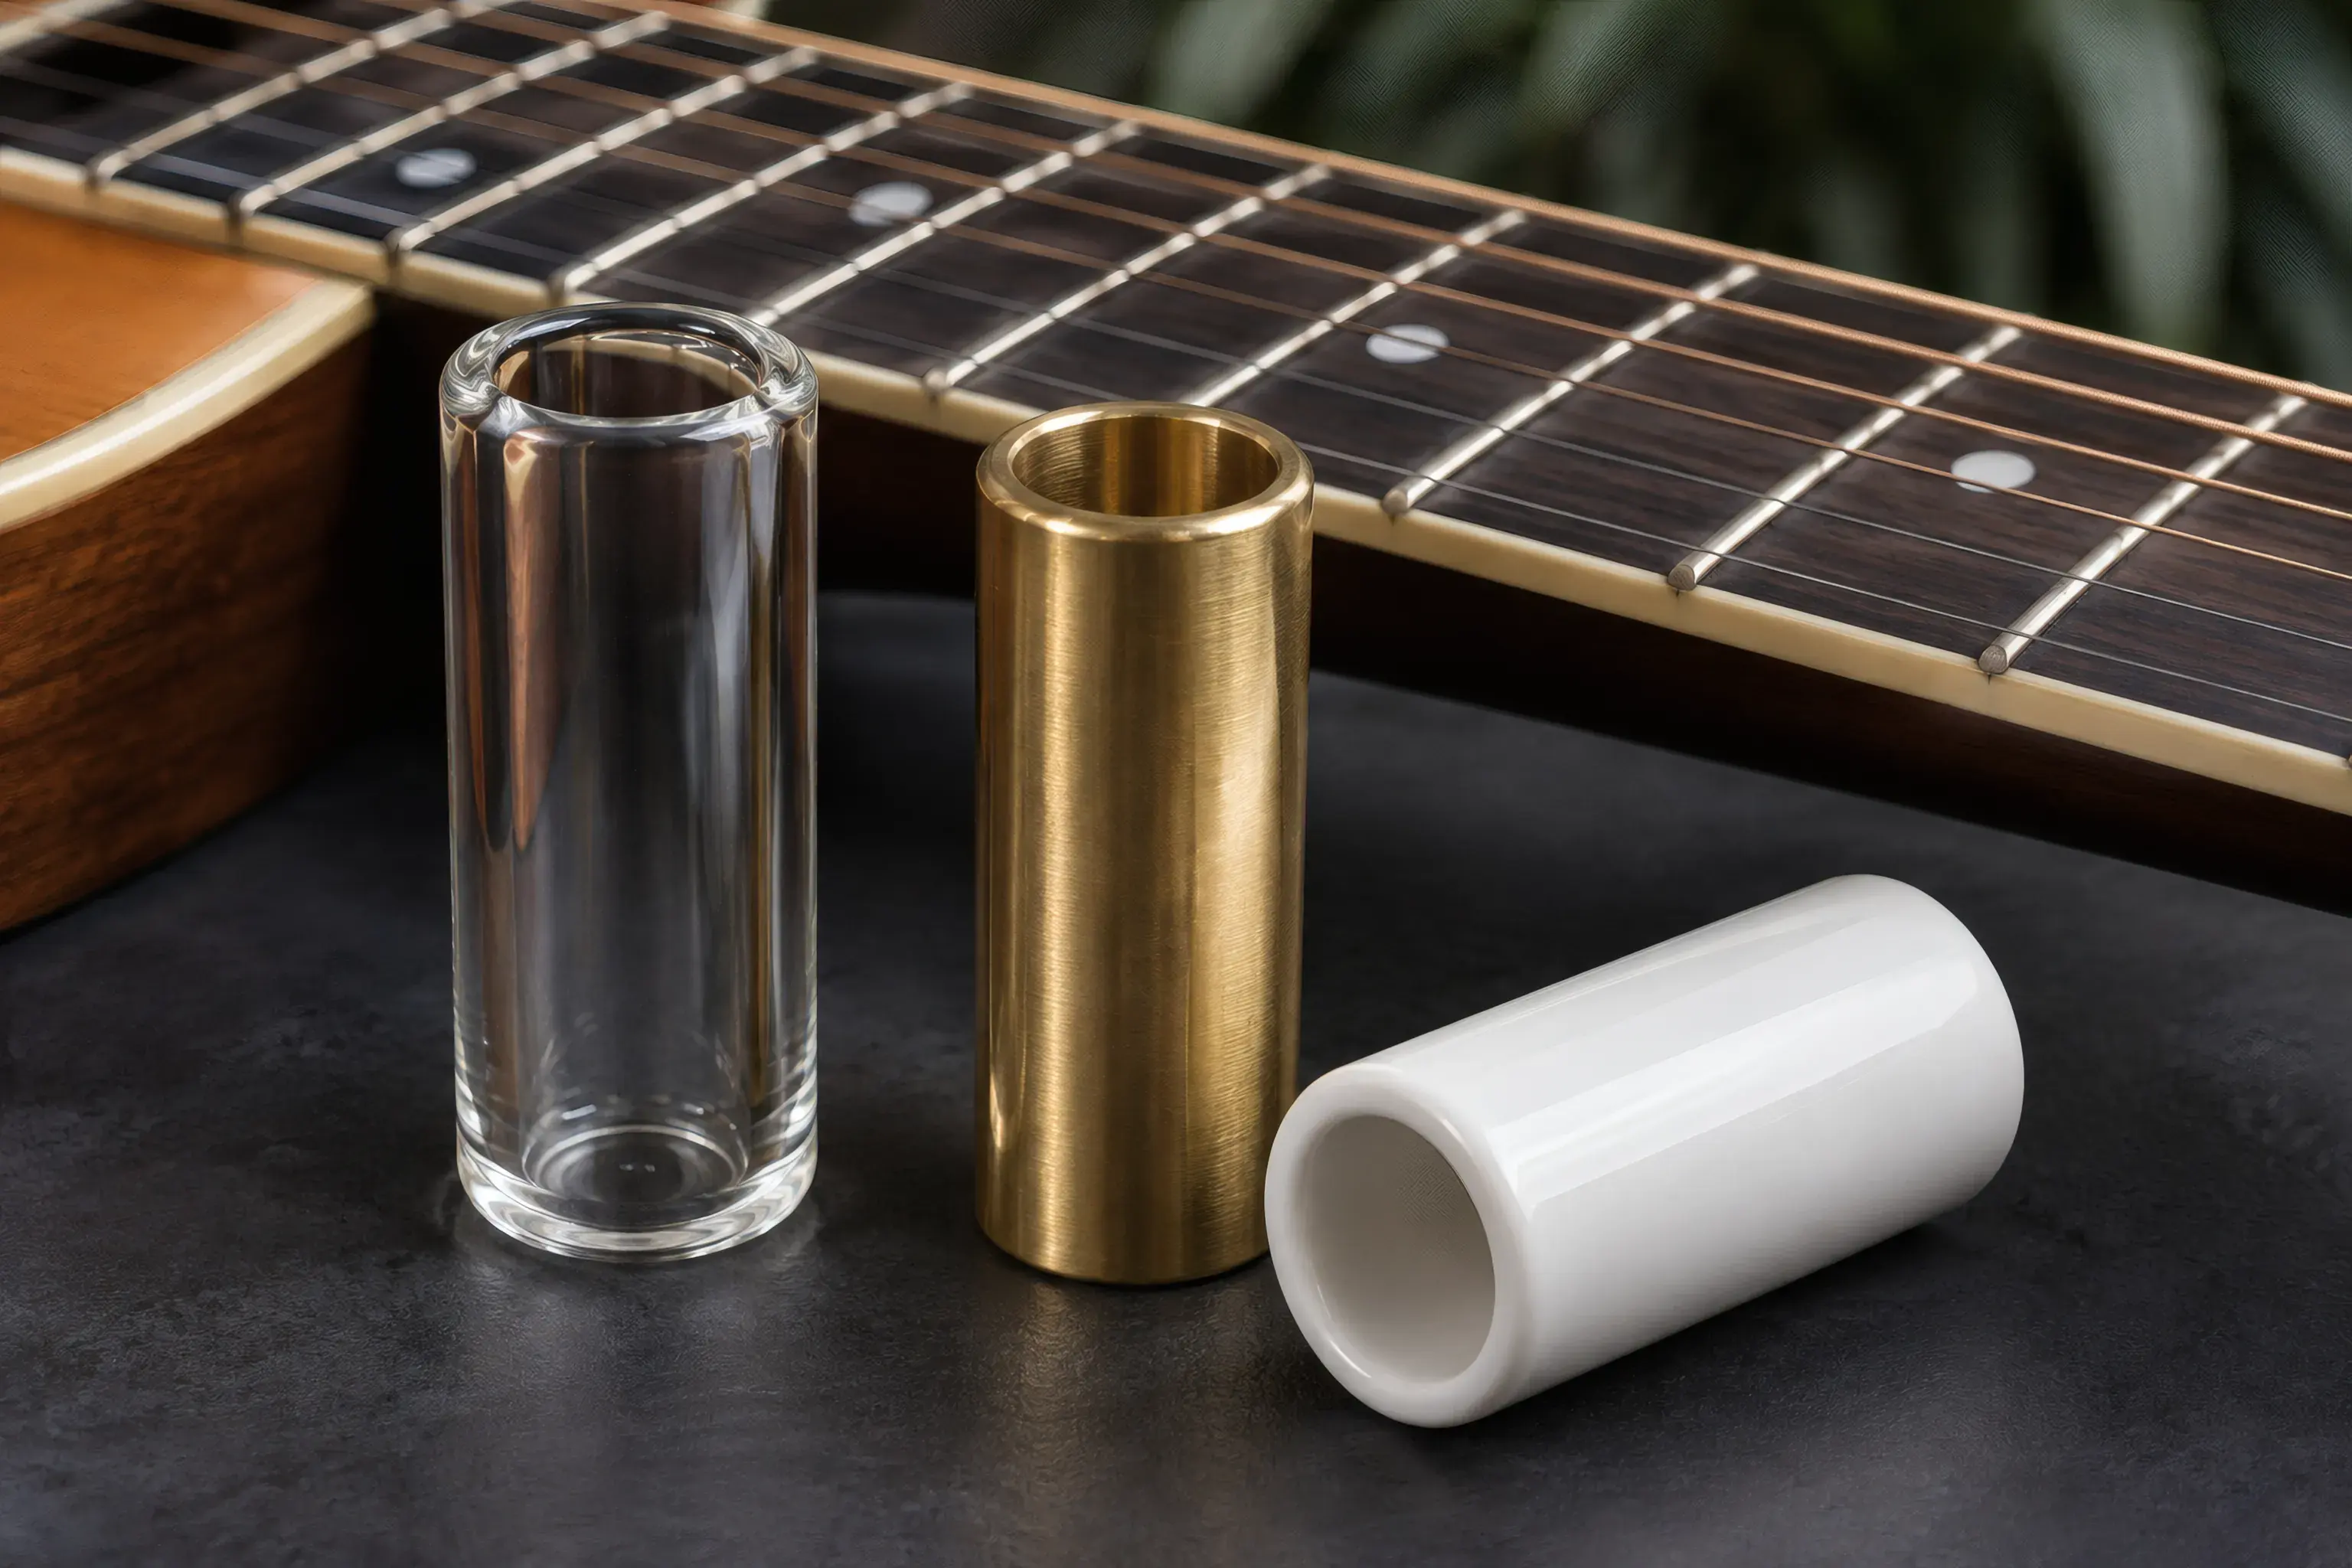
Glass vs steel
Glass slides sound warm and smooth. The attack is soft, the sustain is round, and mistakes are a little more forgiving. Most beginners do best starting here.
Steel (or brass) slides sound brighter and louder, with more bite and more sustain. They also amplify every rattle and buzz, so save metal for when your muting is reliable.
Which finger?
Two common choices:
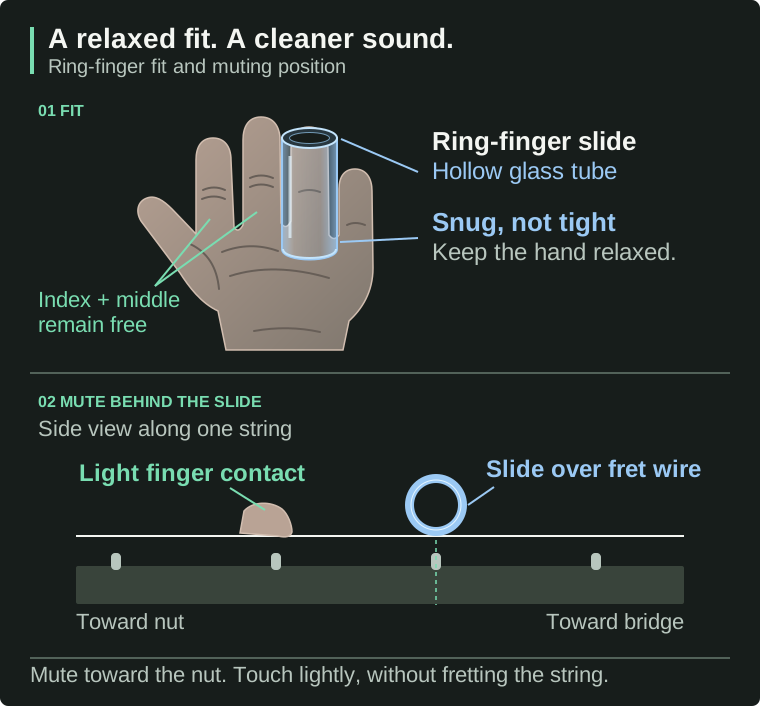
- Ring finger: leaves your index and middle fingers free to fret normal notes and mute behind the slide. The most common setup for players who mix slide and regular fretting.
- Pinky: the classic blues choice. Leaves all three other fingers free for chords and muting. Slightly harder to control at first because the pinky is weaker.
Either works. Pick one and stay with it for a month before judging.
Fit and weight
The slide should hug your finger without squeezing. If you can shake your hand gently and it flies off, it's too big. If your fingertip goes numb, it's too small. Most slides come in small, medium, and large sizes.
Weight matters more than beginners expect. Heavier slides sustain longer and need less pressure, but are harder to steer; lighter slides are easier to control but can sound thin. Medium-weight glass is the safest first buy.
How to wear it
This surprises everyone: loose grip, floating slide. Your slide finger stays relaxed and roughly parallel to the frets. The slide rests on top of the strings; it never presses them down to the fretboard. Your other fingers trail behind it, lightly touching the strings to mute.
Slide Technique Fundamentals
Four habits separate clean slide playing from a mess of rattles. Drill these before you worry about licks.
1. Position directly over the fret wire
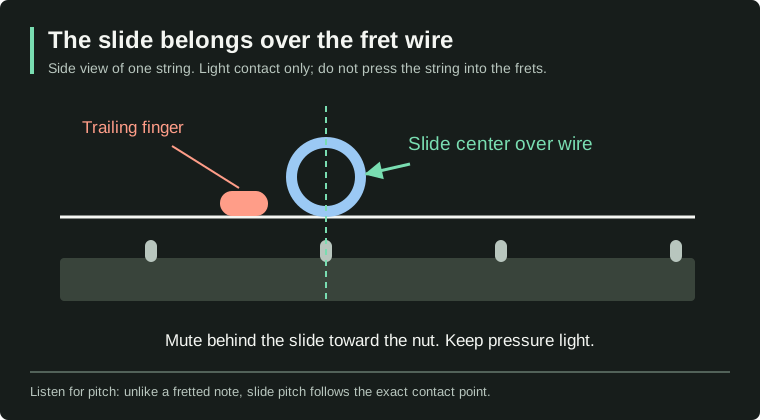
With normal fretting, you place your finger just behind the fret. With a slide, the rule flips: the center of the slide must hover directly above the fret wire itself. If you line up between the frets like a normal finger, every note comes out flat.
Your eyes can't see the wire well from playing position, so use the fret markers as guides and trust your ears. When a note sounds slightly off, nudge the slide a millimeter either way until it locks in.
2. Use light pressure
The slide only needs to touch the strings enough to define a speaking length. Pressing harder pushes the strings toward the fretboard, makes them rattle, and pulls the pitch sharp. Let gravity do most of the work. If you hear buzzing frets, you're pressing too hard, not too soft.
3. Vibrato by rotating the hand
Slide vibrato is what makes the style sing. Instead of bending the string like a normal finger, you rock the slide side to side along the string, pivoting from the wrist, a small rotation of the whole hand, centered on the fret wire.
Keep it narrow. For this exercise, center the motion over the target fret wire and rock a small, equal distance toward the nut and toward the body. The pitch moves slightly flat and slightly sharp around the target, returning to center rather than drifting away. Start with one full back-and-forth cycle per metronome click at 60 BPM, then try two.
4. Mute with both hands
Open strings ring, and every string you're not playing wants to join in. Two layers of muting fix this:
- Behind the slide: drag one or two fretting-hand fingers lightly across the strings behind the slide. This kills the ghost notes that would otherwise ring between the slide and the nut.
- Picking hand: rest the edge of your palm on the low strings you aren't playing, the same way you'd palm-mute a riff.
If you only learn one thing from this page, learn this: good slide tone is mostly muting.
Open Tunings for Slide
You can play slide in standard tuning (E A D G B E), and plenty of greats do. But open tunings (where the open strings already form a chord) are why slide guitar sounds the way it does. Lay the slide straight across any fret and you get a full, in-tune chord. That's the whole sound of slide blues.
Here are the three tunings worth knowing:
| Tuning | Open strings (low to high) | Chord it spells |
|---|---|---|
| Open G | D - G - D - G - B - D | G major |
| Open D | D - A - D - F# - A - D | D major |
| Open E | E - B - E - G# - B - E | E major |
Open G is the best starting point: you only retune three strings, everything moves down (no added tension), and it's the tuning behind a mountain of blues and rock slide parts. Open D has a deeper, darker low end. Open E sounds great but raises three strings, which adds tension, better on an electric or a sturdy acoustic.
Getting there from standard tuning
Here's the compact map of what moves. Full step-by-step walkthroughs live in the tuning guides linked below.
| String | Standard | Open G | Open D | Open E |
|---|---|---|---|---|
| 6th (low E) | E | D (down 2 semitones) | D (down 2) | E (same) |
| 5th (A) | A | G (down 2) | A (same) | B (up 2) |
| 4th (D) | D | D (same) | D (same) | E (up 2) |
| 3rd (G) | G | G (same) | F# (down 1) | G# (up 1) |
| 2nd (B) | B | B (same) | A (down 2) | B (same) |
| 1st (high E) | E | D (down 2) | D (down 2) | E (same) |
Notice how little Open G asks of you: only three strings move, all of them down, and the middle three stay put.
For the full tuning walkthroughs with tuner presets:
- Open G tuning guide and the Open G tuner preset
- Open D tuning guide and the Open D tuner preset
Why open tunings suit slide
Two reasons. First, chords: in these open major tunings, a straight slide across one fret gives you a major chord. Second, familiar chord positions are easy to find. In Open G, use the open strings for G, fret 5 for C, and fret 7 for D to play the I–IV–V progression below. Arbitrary frets are not guaranteed to fit the key: fret 1, for example, gives Ab major. Choose your landing positions to match the chord or melody rather than assuming every fret belongs.
One honest caveat: some players set up a dedicated slide guitar with higher action and heavier strings to reduce fret rattle and add sustain. That can help, but it's optional and instrument-dependent; you can learn everything on this page with a normal setup and a light touch. Don't modify a guitar you love just to try slide.
First Slide Licks
Time to make noise. Start in Open G.
The I-IV-V map in Open G
In Open G, your three home positions for a blues in G are:
- Open strings = G chord (the I)
- Slide bar across the 5th fret = C chord (the IV)
- Slide bar across the 7th fret = D chord (the V)
Strum each position with the slide flat across all six strings, centered over the wire. Play G for four bars, C for two, G for two, D for one, C for one, G for two; that's a 12-bar blues with three moves.
A simple phrase in standard tuning
Stay in standard tuning for this one. On the high E string, pick at the 3rd fret (G), slide up to the 5th fret (A), hold for a beat, then slide back to the 3rd fret (G). Over an E blues, G and A give you the flat 3rd and the 4th against the chord. Keep the slide on the high E string and mute the other strings with your picking hand.
Your first 1-bar lick in Open G
This lick lives on the 1st string (tuned to D in Open G) over a G groove. The 3/5 means slide from the 3rd fret up to the 5th in one motion without re-picking. Count it as eighth notes: 1 & 2 & 3 & 4 &.
D (1st)|--0---3---3/5--5---3---0---3---0--|
B (2nd)|----------------------------------|
G (3rd)|----------------------------------|
D (4th)|----------------------------------|
G (5th)|----------------------------------|
D (6th)|----------------------------------|
Every note here is a chord tone or blues note in G: open D, F at the 3rd fret (the flat 7th; that's the blues sound), and G at the 5th fret (the root). Play it slowly, land exactly on the wire each time, and loop it until the slide from 3 to 5 stops overshooting.

Practice Exercises
Fifteen focused minutes a day on these beats an hour of noodling.
Exercise 1: The 5-to-7 landing drill
On the high string, play the 5th fret with the slide, then glide up to the 7th and stop dead on the wire. The goal is landing exactly on pitch with no wobble and no correction. Alternate 5, 7, 5, 7, one note per click at 60 BPM on the metronome. When ten in a row land clean, raise the tempo 5 BPM or move to another string.
Exercise 2: I-IV-V changes in Open G
Set the metronome to 70 BPM. Play one bar each of open (G), 5th fret (C), 7th fret (D), back to open, strumming once per beat, slide flat across all six strings. The hard part isn't the positions; it's moving between them without a gap. Lift the slide a hair off the strings during moves so chord changes don't smear into a siren.
Exercise 3: Vibrato control on a sustained note
Hold the slide at the 7th fret on the 3rd string. Pick once and sustain for four full beats at 60 BPM, adding one slow vibrato rock per beat. Listen for the pitch returning to center after every rock. If the note drifts flat or sharp over the four beats, your "center" isn't really over the wire; find it again and restart.
Pitch-check routine with the online tuner
Your ears are the goal, but a tuner is the honest referee while they develop:
- Open the slide pitch-check tuner in a quiet room. This custom configuration has three targets: D4, G4, and A4. They are checkpoints for one string, not a tuning for the whole guitar.
- Select the D4 target, enable the microphone, and play the open 1st string of your Open G guitar. It should read centered on D4.
- Select G4, then slide to the 5th fret on that same string and hold. It should read centered on G4.
- Select A4, then slide to the 7th fret and hold. It should read centered on A4.
- Repeat those three checkpoints without looking at your hand, selecting the matching target before checking each landing. For other frets, configure their actual note and octave in the custom tuner first; the standard open-string preset cannot center every chromatic note.
When your landings center on the tuner without correction, your intonation is real, not luck. A slide behind the target wire on the nut/headstock side makes the note flat; move it toward the body until it is centered over the wire. A slide beyond the wire toward the body makes the note sharp; move it back toward the nut. Excess pressure can also pull notes sharp, so keep your touch light.
Audio and Backing Tracks
Hearing the target sound matters as much as any drill.
Clean vs buzzy slide tone. Record yourself playing the 5-to-7 landing drill twice: once pressing the slide firmly, once letting it float with your muting fingers trailing. Play both back. The floating take should sound rounder, with no fret rattle between notes; that difference is what you're chasing.
Open G blues backing loop in G. A slow 12-bar blues in G at around 70 BPM is the perfect canvas for everything on this page. Play the I-IV-V map along with it, then improvise with the 1-bar lick from above. Listen for where beat 1 lands and make sure your slide arrives on each new chord on the downbeat, not sliding in late.
FAQ
Do I need special strings for slide?
No. Whatever strings you play now are fine for learning. Some slide players prefer heavier gauges (think 11s or 12s) because they resist rattle and sustain longer, and some raise their action slightly, but both are optional, instrument-dependent tweaks, not requirements. A light touch on normal strings beats heavy gear every time.
Can I play slide in standard tuning?
Yes, and you should try it; the standard-tuning phrase above is a good start. The catch is that a flat bar across the strings in standard tuning doesn't make a major chord, so you mostly play single notes and two-string fragments. That's a real style of its own, but open tunings are the faster route to full slide chords.
Why does my slide sound out of tune?
Almost always one of four causes: the slide isn't centered over the fret wire (most common), you're pressing hard enough to bend the strings sharp, the slide is tilted so it isn't parallel to the fret, or your vibrato is wandering instead of returning to center. Run the pitch-check routine above against the online tuner and the culprit will show itself within a minute.
Your next session
Tune to Open G with the Open G tuner preset, set the metronome to 60 BPM, and run the 5-to-7 landing drill until ten in a row sit dead center. That's the whole foundation of slide guitar for beginners; everything else is decoration on a slide that lands where it should.